Table Of Content

These stray hairs can be made with quick deliberate marks with a sharpened HB pencil. We understand forms because of the manner in which light interacts and behaves on them. Therefore, we understand forms in a drawing through the use of value. The placement of dark and light values on a subject inform us of the intensity of light and the nature of the form. We'll draw the contour lines lightly and loosely with a harder and lighter, 2H pencil. We're careful not to place too much pressure on this harder pencil as this can lead to indenting in the surface of the paper.
How to Draw Hair in Manga and Semi-Realistic Styles
It is very light, so when the character moves, the wind, the humidity, or anything that surrounds it can affect its silhouette. Hair locks must somehow wrap the head following the curves of its surface. Both circles have a layer around them, but A looks more like a flat shape, whereas B looks to be more spherical.
Drawing Hair - The Four-Step Approach
These video lessons will give you a framework, or 'order of operations', for approaching drawings of any subject matter, including hair. Matthew has been creating drawing and painting tutorials since the relaunch in 2020. Through his involvement with artincontext.org, he has been able to deepen his knowledge of various painting mediums. For example, watercolor techniques, calligraphy and lately digital drawing, which is becoming more and more popular.
Determine the hair style and shape
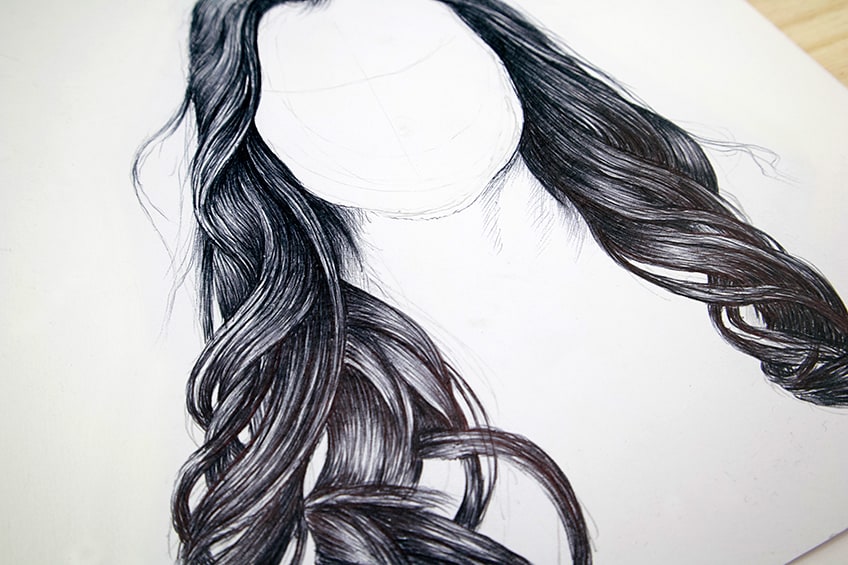
Gently outline the hair without drawing lines that are too thick. Make the general outline complete by drawing the hairline next to the ear. In this case it will also be the outline of the whole haircut. Draw the direction of the hair gently flowing down over the shoulders. Keep in mind that you're not drawing the single hairs here, just their flow.
When learning how to draw realistic hair with a pen it is essential to understand the various pressures applied to the pen for various tones. Light hand for lighter tones and more pressure for darker strokes. Before we begin to draw and shade with a pen, take a moment to analyze your source image again. We can see that shadowing is formed in little areas that seem to be inside of the hair as if you can see through the first layer of hair.
Tutorial summary

In this tutorial, I will introduce 4 simple steps for drawing realistic looking hair. Similar to the first hairstyle begin by applying an initial series of strokes that will define the light, medium and dark areas of the hair. Again be sure to make these in a way where they flow along the shape of the hair. As this hairstyle is much more symmetrical then the first one it will tend to have much smoother transitions between these areas than the first example. Next, begin to add value to the darker shapes first.
Art Periods – A Detailed Look at the Art History Timeline
I think no bangs would be better, but I want some hair to cover one eye, and the tips of the hair to curl inwards. Add strands of hair in the form of little springs all around the head. Hair is very difficult to draw, because what we see is different than what we know. You can't simply draw all the hairs in the form of lines, because that's not what we see when we look at hair. What we see must be simplified to lines and shades, and there are many ways to do it.
Hair varies so much from hairstyle to hairstyle that it requires us to be flexible in our approach. In this step by step hair drawing tutorial I'll presentconcepts to help you problem solve your way through all of your hair drawingsagas. What we want to do now is go over our source image and take note of all the little wispy hairs around the head. These little rogue hairs can be drawn very lightly with our pens. This is a great way to give off the quality of how hair acts naturally. This action of light strokes with a gentle hand is the aim of the shading process done with a pen.
Learn Art Online
Well, the results may be different, but the thought process is the same. We'll still need to start with the overall shape of the hair. Curly hair tends to have more stray hairs that find their way outside the confines of the general shape. For this reason, we'll concentrate on drawing the shape without all of the stray hairs.
Darlene created RFA In 2013 with the goal of sharing simple yet detailed drawing tutorials with other artists on the world wide web. She is a self taught pencil portrait artist and Youtuber. Gradually darken the overall drawing until you create a good balance between the various areas of the hair.
The other styles have shortened instructions to avoid repetition. For me this is a fun step because I usually experiment more in coloring hair—therefore my drawing style keeps changing. Either your character has straight, unruly, wavy hair... You have to know the shape of the hair you want to draw.
Marking a reference point or a route which divides the hair can help us. From there, it becomes easier to see the direction that each section will take (2). Shade the whole haircut now, drawing curls all around. Afro-textured hair has a lot of curly strands and texture.
To decide which details areimportant to include and which I can simplify or leave out of mydrawing. I want my pencil marks to be considered, conscious decisions. We have our pencils sharpened and our eraser, sharpener, and a full range of pencils ready for use. We should also have our source image next to us and our drawing station in a well-lit room.
Haircan be thought of as various forms depending on the hairstyle. Forexample, some curls can be thought of as cylinders, and can be renderedin much the same way. Notice that both the curl and the cylinder have ahighlight, halftone and shadow area. The core shadow on the curl issomewhat obscured by its texture. Toreach both of these goals, drawing every hair or curl that I see doesnot have to be a priority. Instead, part of my challenge will be tofigure out how to design what I see.
Butler HS hair policy drawing national attention - ABC10.com KXTV
Butler HS hair policy drawing national attention.
Posted: Thu, 28 Jul 2016 07:00:00 GMT [source]
The action should be guided by the source image’s depiction of shadowing in the hair. These segments, within the source image, are broken up by the shadows in the hair. Try to follow your intuition when drawing shadows and highlights for hair. “Lighting” is an extensive and super interesting topic, and I am afraid that what I explain here is not enough to cover it! I’d recommend researching and practicing as much as possible.
Don't be afraid to work the values to increase the contrast. Adjust darker tones by adding additional applications of graphite and make areas lighter with your eraser. You may start by taking a photo of someone's hair - perhaps your own. Look for a defined collection hair that forms a shape.


No comments:
Post a Comment